Rekordbox 7 Performance mode – tutorial with pictures – (Rekordbox DJ)
Table of Contents
- Video
- What is the Rekordbox Performance mode a.k.a. Rekordbox DJ?
- Layout user interface
- Confusion: does performance mode make a difference?
- Is Rekordbox Performance mode free?
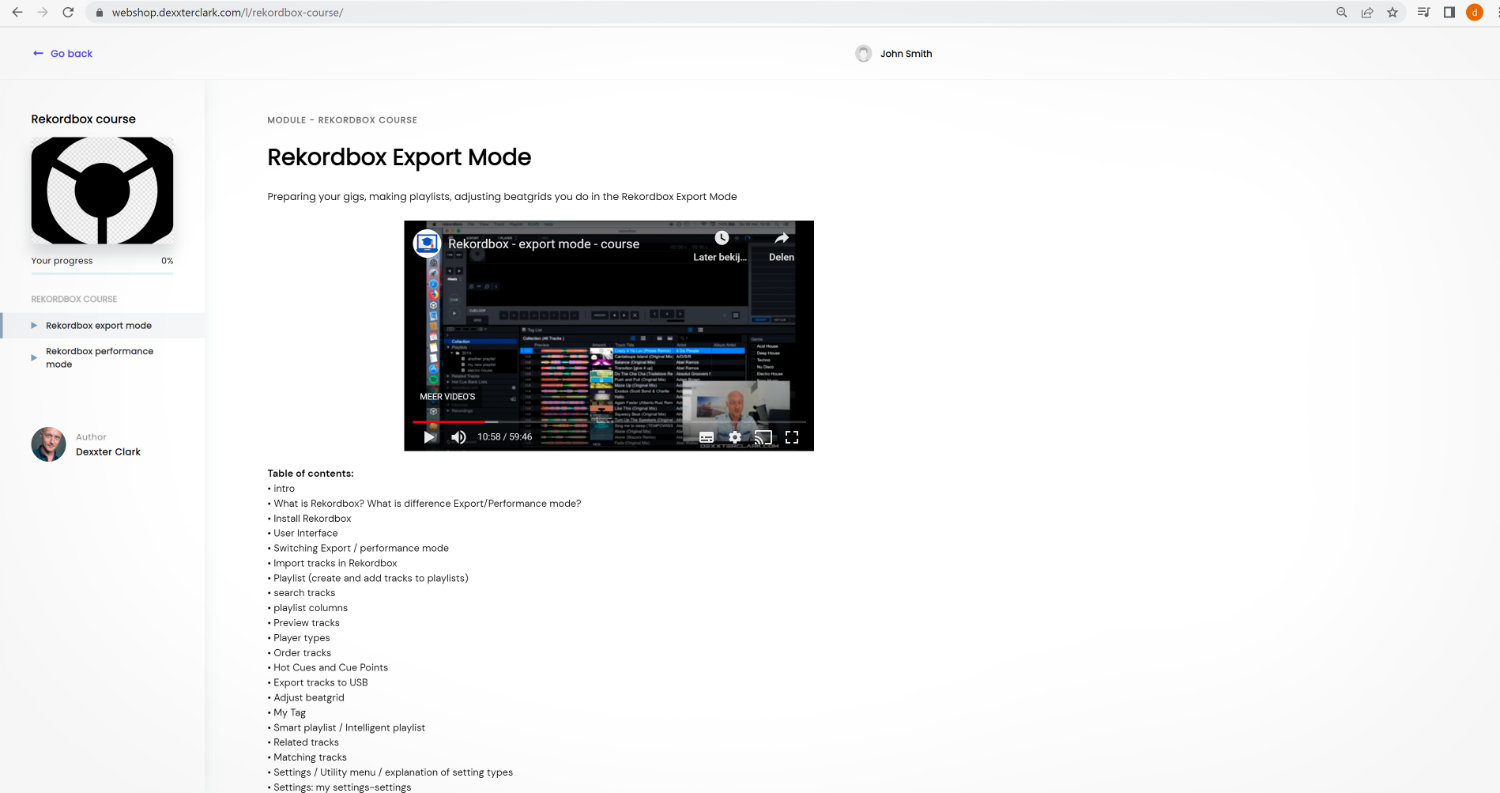
Video
What is the Rekordbox Performance mode a.k.a. Rekordbox DJ?
The Rekordbox Performance mode is focused towards playing the tracks you have prepared in the Export Mode.
The name “Performance mode” refers to: performing a DJ gig, because that’s what it is meant to do.
You can see the Performance mode as: DJ mode.
With Performance Mode you can:
- Mix 2,3,4 tracks together by EQ mixing or stem mixing.
- Beatmatch tracks (beatmatch tutorial)
- Apply sound effects like: echo, delay, reverb, flanger, roll, noise and many more
- Change the tempo of tracks
- Change the pitch/key of tracks
- Play sound effects
- Record your mixes (need subscription)
- Rudimentary auto-mix by playing one song after the other in a playlist
- Use a DJ controller
- Use DVS (digital vinyl) (need subscription)
- Play videos (need subscription)
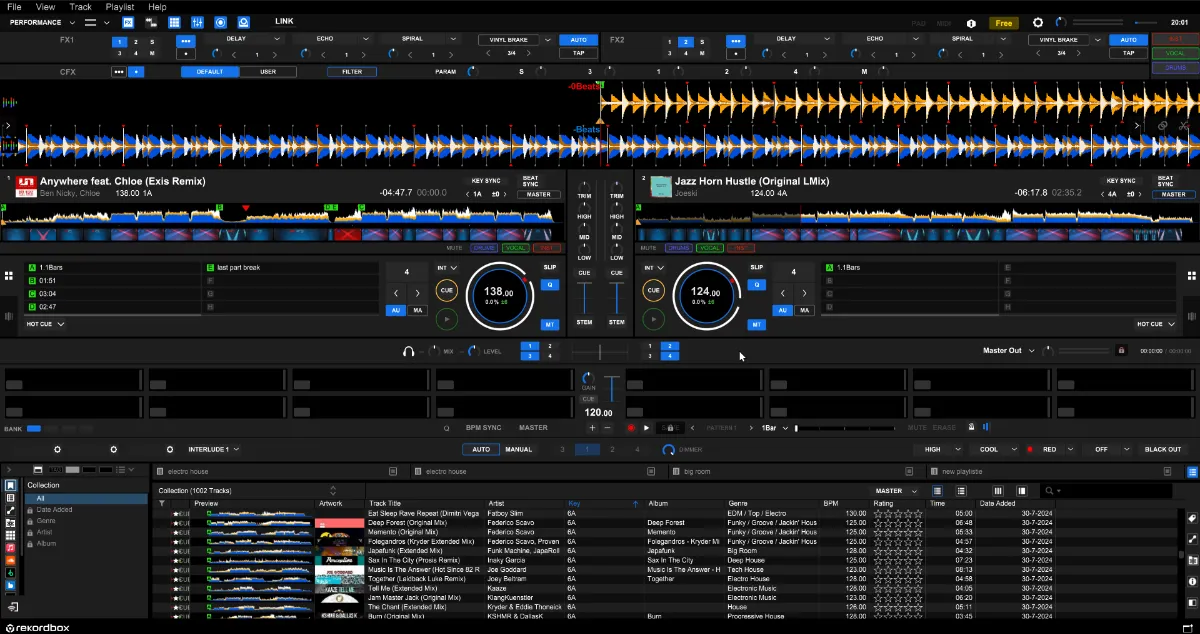
Layout user interface
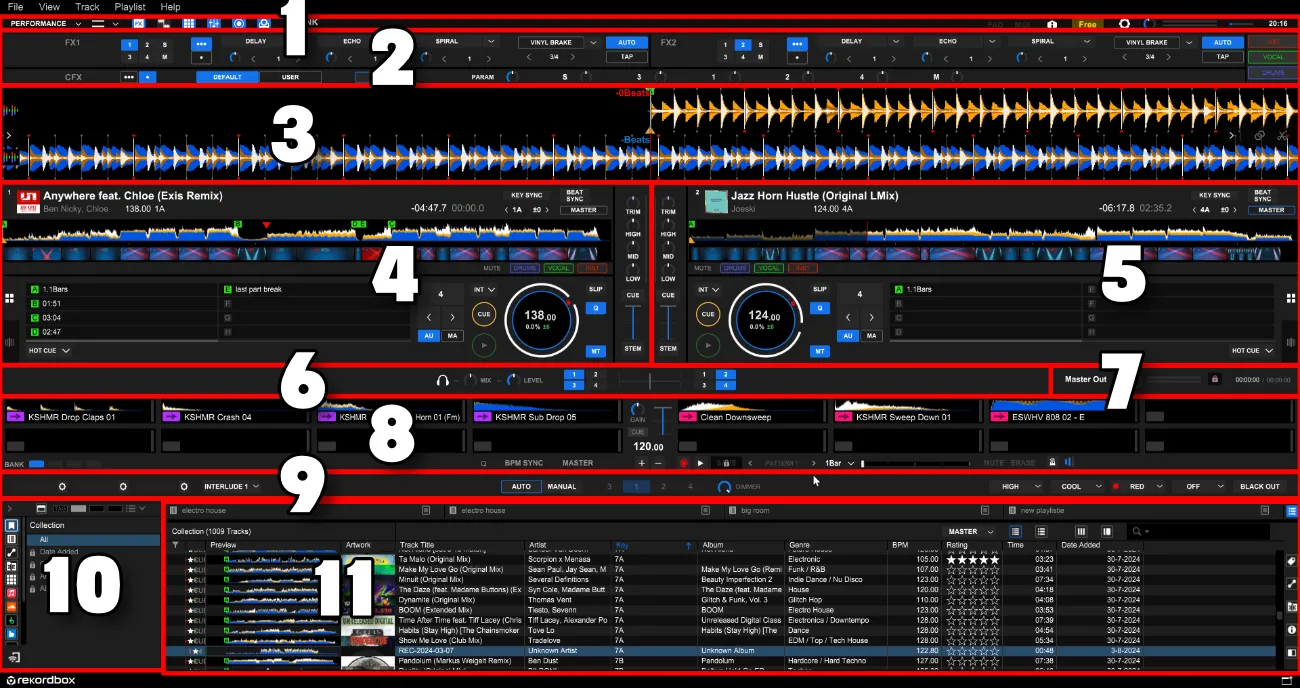
For this example I’ve enabled all screen elements.
Your software may not have the same screen elements enabled, hence your screen may look different.
You can enable/disable screen elements in the Command-panel.
- Command panel
- Sound effects panel
- 2 Waveforms (1 for Deck 1, the other for Deck 2)
- Player deck 1
- Player deck 2
- Mixer panel
- Record panel
- Sampler
- Lighting panel
- Library / sources panel
- Track list
Command panel

- Mode switcher (Export, Performance, Lighting, Edit) (more about modes)
- Player modes (2Deck horizontal, 2Deck vertical, 4Deck horizontal, 4Deck vertical, browse)
- Show/hide Sound Effects panel
- Show/hide mix point link panel – changes layout of waveform to set mix-in and mix-out points for auto mixing)
- Show/hide sampler panel
- Show/hide mixer panel – in the horizontal-middle of the screen, but also in the vertical-middle in between player decks
- Show/hide record panel
- Show/hide lighting panel
- Enable/disable Ableton Link – only works when you have Ableton Live installed
- Open Pad Editor window
- Open Midi Learn window – connect a midi controller and use it to control Rekordbox
- Show unnecessary information window
- Show buy subscription window
- Show preferences window
- Volume control
- VU loudness meter
- CPU usage meter
- Time
In the command panel you can add or remove screen elements.
Sound effects panel

- FX1 panel – first sound effects panel
- FX2 panel – second sound effects panel – is the same as FX1
- CFX panel – Color FX – a different type of sound effect
FX1 panel

- Source selector (Deck 1, 2, 3, 4, sampler, master output)
Sound effect is only applied to this source.
When it is applied to the master: it is applied to all sound coming out of Rekordbox. - Sound effect multi-mode (3 dots), or single mode (1 dot)
- In multi-mode: you can apply 3 sound effects
- In single-mode: you can apply 1 sound effect, but you have control over the sound of the effect
- Sound effect name
Click on the name to apply the sound effect, it will get a blue border to indicate it is applied - Sound effect selection menu
Choose another sound effect from the list - Volume of the sound effect
- How long is the effect applied?
- < – shorten the effect
- 1 – means 1 beat, 2 means 2 beats etc
- > – lengthen the effect
- Another type of sound effect that doesn’t work
- AUTO/TAP – how is the tempo of the effect determined?
By the BPM of the track, or by tapping the TAP-button?
Rekordbox hard?
Don’t worry, I created a step-by-step video training to teach you all the ins and outs of Rekordbox.
CFX panel

- Sound effect multi-mode (3 dots), or single mode (1 dot)
- In multi-mode: you can apply 3 sound effects
- In single-mode: you can apply 1 sound effect, but you have control over the sound of the effect
- DEFAULT/USER – [not sure why this even exists]
- DEFAULT – can’t swap sound effect for another
- USER – can swap sound effect
- Sound effect name
Click on the name to apply the sound effect, it will get a blue border to indicate it is applied - Change parameter knob
Different for each sound effect. For “filter” it is the frequency - Volume knobs for each source: Deck 1, 2, 3, 4, sampler, master output
Waveforms
The left side of the waveforms looks like this:

- Reflect stem separation for Deck 1 visually in waveform
Icon colored: enabled.
Icon white: disabled.
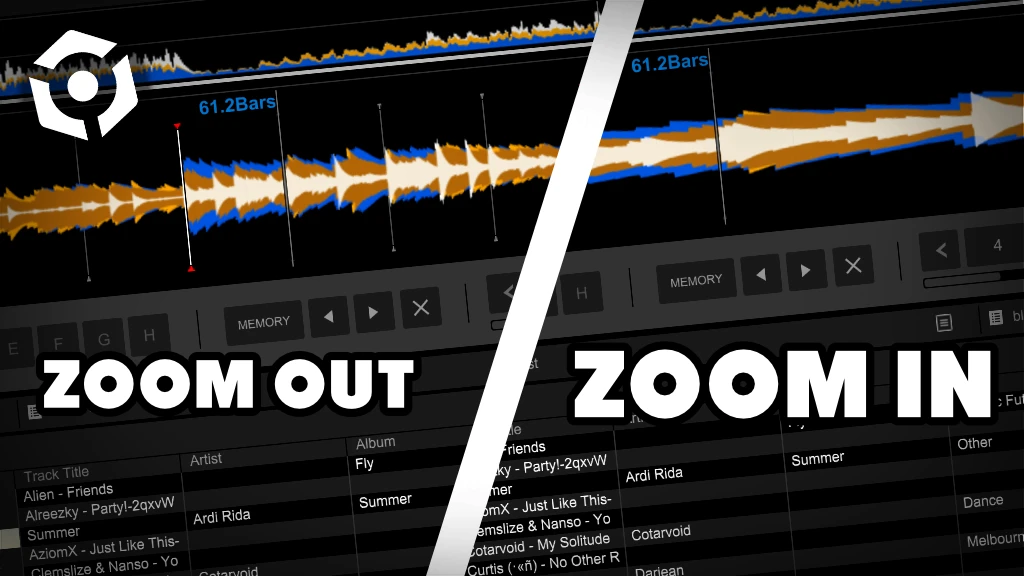
See individual player decks to select the exact stems to separate - Zoom in and out.
If you don’t see this control, click on “>”, the control will expand - Reflect stem separation for Deck 2 visually in waveform
Icon colored: enabled.
Icon white: disabled. - First beat of the bar (red triangle on top of a line)
- A beat in a bar (white triangle on top of a line)
- Hot Cue A, B, C, D, E or F (in this case: green colored “B”) (hot cue tutorial)
- Memory Cue (white triangle on top of a line when coming up, red triangle when passed) (memory cue tutorial)
- Cue Point set with the cue button (yellow triangle on bottom of line)
- How many beat remaining till next Memory Cue?
- Play head (red line in the middle of the screen)
The right side of the waveforms looks like this:
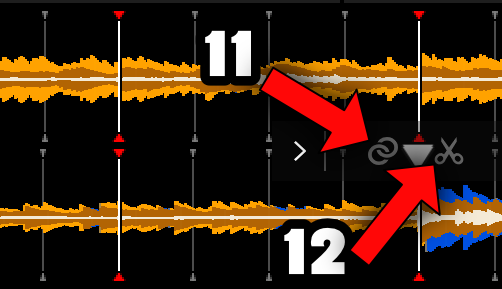
11. Click to “link” tracks together as track match (track match tutorial)
12. Save loop to sampler. (after setting loop: click this icon. Then drag loop to sampler slot)
Player decks
Deck 1 and 2 have the same controls, but some controls for deck 2 are mirrored in the layout.
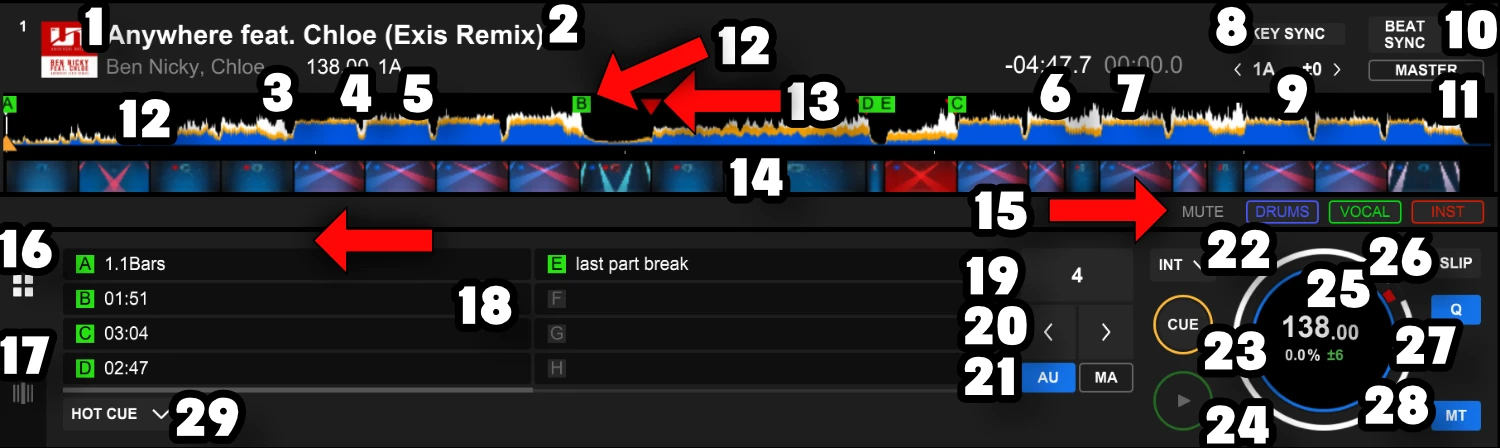
- Album art
- Title
- Artist
- BPM
- Key in Camelot notation
- Remaining time track
- Elapsed time track
- Key sync (copy the key of the master deck and apply to current deck, hence pitch shifting the track)
- Manually pitch/key shift
< – lowers the key
> – increases the key
1A – the new key in Camelot notation
+0 – the amount of shift - Beat sync (copy the tempo of the master deck and apply to current deck, hence changing the speed of the track)
- Make this deck “master”, other decks become “slaves”
- Hot Cue “B” (hot cue tutorial)
- Cue Point (white triangle when coming up, red triangle when passed)
- Lighting scenes
- MUTE, DRUMS, VOCAL, INST(rumental): stems. Click to switch stemp on/off
- Performance pads panel (=currently showing)
- Beatgrid edit panel (edit beatgrid tutorial)
- Performance pads
- auto loop. Currently set to 4 beats (hence button displays “4”). Click to engage
- Shorten auto loop (<)
Lengthen auto loop (>) - AU/MA – auto or manual loop
AU – auto loop, use controls #19 + #20
MA – manual loop - DVS modes: INTERNAL, ABSOLUTE, RELATIVE (need subscription)
INTERNAL – ignore time code from vinyl
ABSOLUTE – needle position on record translates 100% position in track. Skipping needle is skipping audio. Can’t use modern features like hot cues for example.
RELATIVE – position on vinyl doesn’t matter. Skipping needle is NOT skipping audio - Cue button (cue button tutorial)
- Play button
- Jog wheel – red rotating line indicates the deck is playing
138 – BPM: Click and drag up/down to change BPM. Click to enter BPM with keyboard
+ (when hovering with mouse) – increases BPM
– (when hovering with mouse) – decreases BPM
up arrow (when hovering mouse) – click-and-hold increases speed temporarily
down arrow (when hovering mouse) – click-and-hold decreases speed temporarily - Slip mode
- Quantize
- Master Tempo also known as Key lock
Mixer panels
There is a mixer panel in between the player decks (vertically):
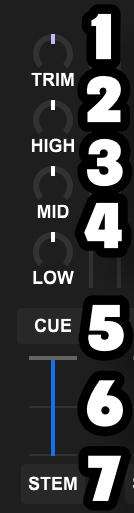
- TRIM: volume knob for this channel.
- HIGH: cut or boost high frequencies
- MID: cut or boost mid frequencies
- LOW: cut or boost low frequencies
- CUE: click to preview tracks via your headphone (you need a separate sound card or dj controller)
- Fader: adjust the volume
- Stem: click to switch between HIGH, MID, LOW frequencies and Stems (Instrument, Vocal, Drums)
Technically there are 2 volume controls.
The idea is that you always use the fader from 0% to 100% and vice versa.
But some tracks are louder than others, to balance that out, you can use the trim-knob.
There is a second mixer in the middle of the screen horizontally:

- MIX: How much of the Master signal and CUE signal do you want to hear in your headphone?
- LEVEL: volume level headphone
- Crossfader assign: which player deck (1,2,3 or 4) is assigned to the LEFT part of the crossfader crossfader (#4)
- Crossfader
- Crossfader assign : which player deck (1,2,3 or 4) is assigned to the RIGHT part of the crossfader crossfader (#4)
Rekordbox hard?
Don’t worry, I created a step-by-step video training to teach you all the ins and outs of Rekordbox.
Record panel

- Recording source (default = Master Out)
- Recording volume
- VU meter
- Record button (need subscription)
- Recorded time
- Remaining time
Sampler
The sampler has multiple slots for sound samples.
In this example are 14 slots of which 8 have sound added.

- Waveform
- Purple arrow: Play the sample
- Mute the sample – shows when hovering with mouse over sample
- Eject/remove the sample – shows when hovering with mouse over sample
- Edit sample, buttons:
- One-shot – play the sample once and stop
- Repeat – repeat sample indefenitely
- Gate – enabled: plays sample until button released, disabled: plays sample always start to finish
- Master Tempo – adjusts pitch to master
- Sync – Tempo sync automatically to sampler BPM (#11)
- Gain – loudness of sample
- Adjust starting point left
- Adjust starting point right
- Halve BPM
- Double BPM
- Bank: select 1 of 4 sample banks
You can have 4 banks of 16 samples in each bank. So you can store 4×16=64 samples - Title of sample
- Gain – volume of all samples
- Fader – volume of all samples
- Cue – enabled: you can hear sampler audio in headphone
- BPM of sample. click and drag-up or drag-down to increase or decrease BPM
- Quantize
- BPM sync
- Master: make the sampler the master for player decks to sync tempo to
- BPM adjuster:
- + increase BPM
- – decrease BPM
- Record sampler sequence
- Play recorded sequence (auto activated when stop recording)
- Save recorded sequence to file (need subscription)
- Recorded sequences
- < previous sequence
- > next sequence
- Change sequence length (1 bar, 2 bars, 4 bars)
- Sequencer beat indicator.
It is basically mini beatgrid for the recorded sequence.
Activated when you play a recorded sequence (#17). - Mute sequence (sequence keeps playing without sound)
- Erase sequence
- Metronome
- Volume of metronome
Lighting panel

- DMX dialog 1: sent parameters
- Enable/disable button for DMX parameters of #3
- DMX dialog 2: sent parameters – when parameters set: to enable, click left of the cog
- DMX dialog 3: sent parameters – when parameters set: to enable, click left of the cog
- Ambient mode on/off. To change click arrow down.
- AUTO/MANUAL target deck selection
- AUTO: change target deck automatically
- MANUAL: change target deck manually (#6)
- Which deck to target (3,1,2 or 4) with manual deck selection (#5)
- DIMMER: change light intensity
- Mood change: on/off. To change mood click arrow down.
- Bank change: on/off. To change bank click arrow down.
- Lighting color: on/off. To change color click arrow down.
- Strobe effect: on/off. To change setting click arrow down
- BLACKOUT: switch all lights off
Free DJ tips in your inbox?
As a bonus gift I will send you a FREE E-book on how to kick-off your DJ career!
Library/sources
Playlist palette

- extra shortcut menu
- Show/hide horizontal subbrowser
- Show tag list instead of playlist palette
- Show playlist palette page 1
- Show playlist palette page 2
- Show playlist palette page 3 (currently selected)
- Show contents playlists from palettes or show taglist (when taglist is selected. See #3)
- Playlist palette slot 1
- Playlist palette slot 2
- Playlist palette slot 3
- Playlist palette slot 4
- Show/hide playlist palette panel
When the playlist palette is not showing, click button #12.
To remove, click button #12 again.
The playlist palette is a panel with multiple shortcuts to playlists.
There are 3 pages (#4, #5, #6) with 4 slots (#8, #9, #10, #11). So you can store 12 (=3×4) playlist shortcuts.
To add a playlist to a slot drag and drop a playlist to one of the 4 slots (#8, #9, #10, #11).
Sources menu
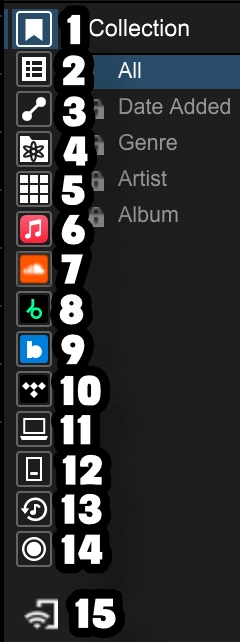
- Collection
- Playlists (playlist tutorial)
- Related tracks & track matches (related tracks tutorial and track matching tutorial) – you defined the related tracks and track matches
- Track suggestions – Rekordbox does track recommendations based on A.I.
- Sampler
- iTunes tracks and playlists
- Soundcloud tracks (streaming, need subscription)
- Beatport tracks (streaming, need subscription)
- Beatsource tracks (streaming, need subscription)
- Tidal tracks (streaming, need subscription)
- Browse your computer for music
- Inserted USB storage devices
- History – tracks you played in the past with performance mode
- Recordings – all the recordings you have made with Rekordbox (need subscription to record)
- Connect to mobile devices to stream music via WIFI
Track list
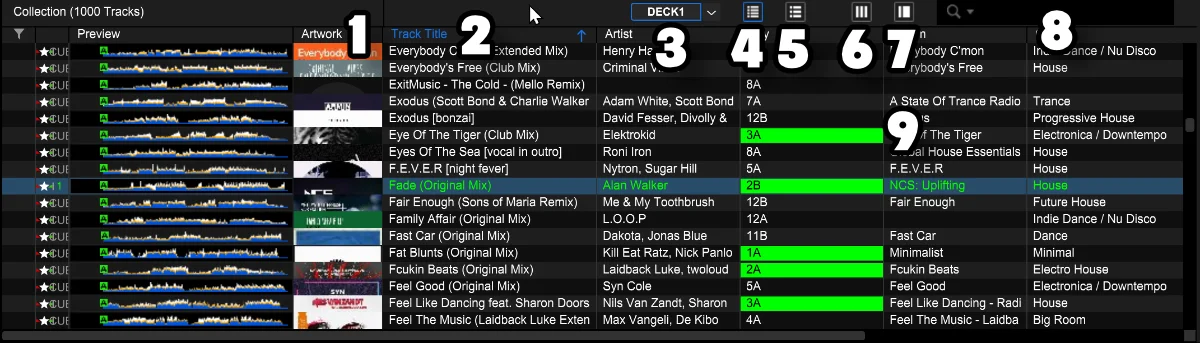
- Table header – right-mouse-click to select or remove columns from the table
- Selected column – click on column header to sort on this column
- 1st mouse click: sort ascending
- 2nd mouse click: sort descending
- 3rd mouse click: don’t sort
- Click to enable/disable traffic light feature.
The traffic light feature colors the cells green of compatible keys (see #9).
Click arrow down to change source of compatible keys.
Options:- Master
- Deck 1
- Deck 2
- Deck 3
- Deck 4
- Shallow column height
- Large column height
- Show/hide track filters 1 for:
- Genre
- Artist
- Album
- Show/hide track filters 2 for:
- BPM
- Key
- Rating
- Color
- Genre
- Components
- Situation
- Search for tracks
- Traffic light feature – a track with compatible key to deck 1 (selected by #3)
Menu on the right

- Show/hide My Tags panel (my tag tutorial)
- Show/hide related tracks & track matches (related tracks tutorial and track matching tutorial) – you defined the related tracks and track matches
- Show/hide track suggestions – Rekordbox does track recommendations based on A.I.
- Show/hide track information of selected track in track list
By clicking on the “Info”-tab you can change info like: track title, artist, artwork, comments, rating etc - Show/hide vertical sub-browser
- Show/hide auto mix panel
- Detach lower panel with sources and tracklist. Click on the “X” in the new window to re-attach it.
Free DJ tips in your inbox?
As a bonus gift I will send you a FREE E-book on how to kick-off your DJ career!
Confusion: does performance mode make a difference?
Yes, the Performance Mode has a different goal than the Export Mode.
The Performance Mode doesn’t mean you get more system performance out of your computer.
Performance mode means: performing a DJ gig.
Is Rekordbox Performance mode free?
Some parts are free, some are unlocked with selected DJ controllers, some are only available with a payed subscription.
The free version is pretty complete
Free are for example:
- EQ mixing
- Volume Faders / Crossfader
- Tempo adjust / tempo matching
- Key adjust / key matching
- Slip function
- Auto stem separation on existing tracks (except vocals)
- Sound effects like: echo, delay, reverb, flanger, roll, noise and many more
Payed are for example:
- Recording your DJ set (can also be unlocked for free with certain controllers)
- Dropbox / Google Drive support
- DVS
- Displaying videos
- Vocal stem separation
Rekordbox hard?
Don’t worry, I created a step-by-step video training to teach you all the ins and outs of Rekordbox.