Complete Rekordbox beatgrid tutorial – Everything you need to know
Table of Contents
What is a beat grid?
The beat grid lays out the measures and the beats of a song:
Where is the first beat of a bar? Where does a bar start?
Analyzing a track
The beat grid can be generated by Rekordbox.
When you import a song Rekordbox can analyze a song, or you can trigger analyzing a song by hand.
You can read everything about analyzing songs in Rekordbox in this article.
2 beatgrids
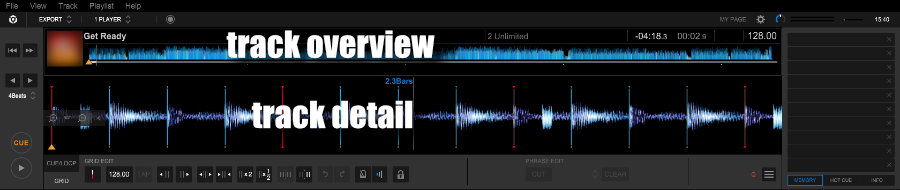
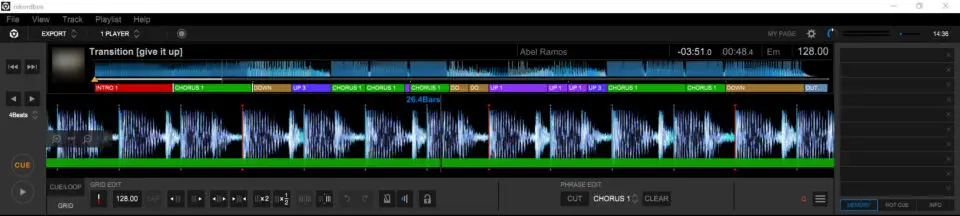
There are 2 beatgrids that show the waveform of the track:
1) the upper beatgrid with an overview of the entire track
2) the lower beatgrid with a detailed view of the current position on the upper beatgrid
Playhead
The playhead points to the current position in the track and is indicated with a white line.
The playhead is always in the middle of the lower beatgrid.
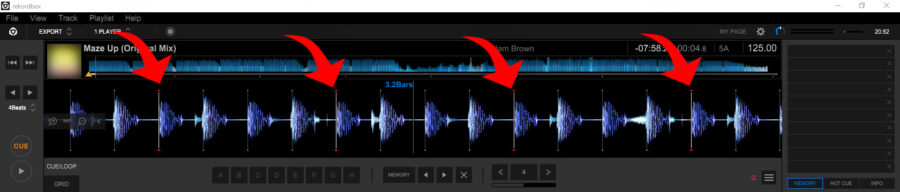
Beats
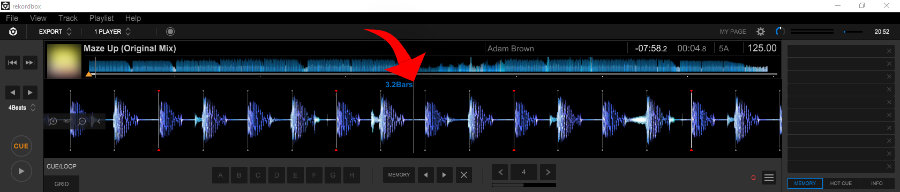
The beats Rekordbox has detected when analyzing the track are indicated by a white line in the beatgrid.
The first beat of a bar is indicated with a red line, but sometimes it’s a tiny red arrow above the white line.
Navigation
You can drag the lower beatgrid with your mouse cursor left and right by clicking and holding your mouse button.
You can zoom in-and-out with the zoom buttons on the left side of the lower beatgrid:
Free DJ tips in your inbox?
As a bonus gift I will send you a FREE E-book on how to kick-off your DJ career!
Video
When you don’t see a video: https://www.youtube.com/watch?v=skdgHZorxio
Rekordbox Beatgrid off? Here’s how to change it!
However track analysis in Rekordbox is far from perfect and sometimes the beat grid is wrong.
With EDM it’s often easy to spot visually if the beatgrid is wrong in the beatgrid.
Regularly beats are detected on the wrong spot in the track, the bpm is wrong or the first beat of the bar is detected on the wrong spot.
There is a way to fix the beatgrid and adjust the beatgrid to move the beats in the right positions.
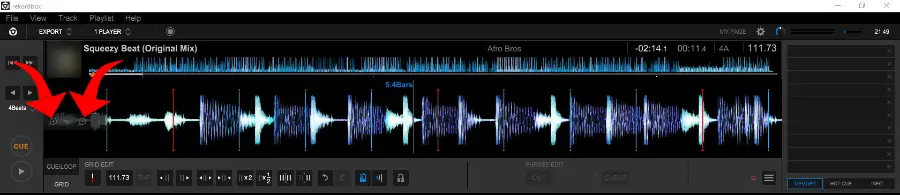
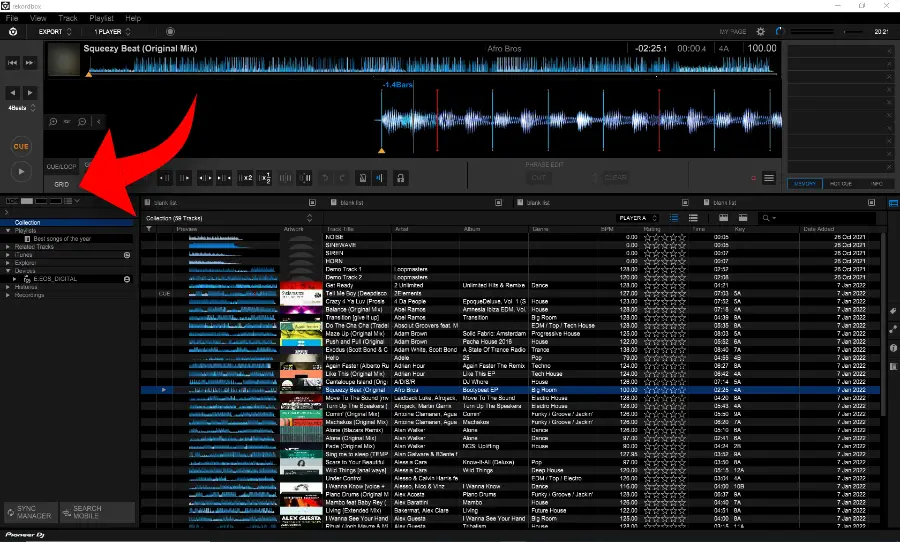
In the Export-Mode click on the “GRID”-button below the “CUE/LOOP”-button to reveal the grid edit functions.
This reveals the following panel:

2 – editbox to change BPM
3 – click on this button while the music is playing
4 – shift beats to the left
5 – shift beats to the right
6 – expand beats intervals (= increase bpm)
7 – shrink beats intervals (= decrease bpm)
8 – double the BPM
9 – halve the BPM
10 – apply changes to whole beatgrid
11 – apply changes only after current position
12 – undo changes
13 – redo changes
14 – enable / disable metronome
15 – metronome loudness
16 – lock changes
17 – enable/disable cut-phrase-mode (blue = enabled; grey = disabled)
18 – pulldown box to select phrase type (intro, outro, chorus etc) – is disabled here
19 – remove all analyzed phrases in song
Changes are small
Be aware that changing the beatgrid (like shrinking beat intervals) is done in milliseconds.
So it may be hard to see a difference in the beatgrid after a change.
Therefore you can zoom in and out with the corresponding buttons on the left side of the beatgrid.
You often need to click a lot on a button to see a noticable difference in the lower beatgrid.
Changing first beat of a bar

Limitations
Changing the first beat of a bar is quite easy, but it has some limitations.
– Rekordbox only supports a 4/4 signature, not 3/4 or any other
– Rekordbox always suspects 4 beats in a bar, even when a 4/4 track is poorly produced and misses a beat after a break (1 bar has 3 beats instead of 4).
The the last case, Rekordbox doesn’t help you. You will have a faulty beatgrid.
To change the first beat
Make sure the playhead is on the right position and click on button 1.
The whole beatgrid will shift (!!!!) with the BPM value set with editbox 2.
Tempo & BPM

Edtbox 2 and button 3 are tempo components.
You can type in a BPM (editbox 2), or you can let Rekordbox determine the BPM with the tap-button (button 3).
To activate the tap button, play the song.
When the song plays, click on the tap-button on the beat of the song.
Rekordbox will calculate the BPM and show the value in editbox 2.

Often Rekordbox detects the BPM wrong.
This happens a lot when a song is extremely fast or slow.
With button 8 you can double the BPM.
With button 9 you can halve the BPM.
Shift beatgrid to left or right

To shift all the bars of the beatgrid to the left 1ms, use button 4.
To shift all the bars of the beatgrid to the right 1ms, use button 5.
Expand or shrink beat intervals

To expand beat intervals, use button 6.
To shrink beat intervals, use button 7.
Apply changes to …

Button 10 and 11 determine how your changes are applied: either to the whole beatgrid or after the current position of the playhead.
These are switch buttons (either one or the other is enabled).
This does not apply to the first beat of the bar.
Metronome

The easiest way to check if the beatgrid is correct by enabling the metronome (button 14).
Click on the play-button to play the song, and listen if the metronome is in sync with the beat.
You can adjust the loudness of the metronome by clicking on the loudness button (button 15).
The metronome can have 3 loudness levels.
Every time you click you increase the loudness.
Lock

I recommend to “lock” your changes after editing the beatgrid with button 16.
When someone would right click on a track and click “analyze” Rekordbox will overwrite the changes you have done to the beatgrid.
With the lock button you can prevent accidental overwrites.
Rekordbox hard?
Don’t worry, I created a step-by-step video training to teach you all the ins and outs of Rekordbox.
Quantize
To put your playhead exactly on one of the beats determined by Rekordbox, use the quantize function.
Make sure Quantize is enabled, move the beatgrid near a white line that represents the beat and click on the “CUE” button.

Phrase edit
Phrase editing works hugely counter-intuitive, so bear with me.
Buttons greyed out
When the phrase edit buttons “cut” and “clear” are greyed out, the track is not analyzed for phrases.
You need to make sure that you have selected the options in the preferences window:
Preferences -> View -> Layout -> Phrase checkboxes and
Preferences -> Analysis -> Track Analysis -> phrase checkbox.
Make sure you analyze the track(s) again after you’ve changed these options.
See analyzing songs in this article for a detailed description.
Selecting and editing phrases
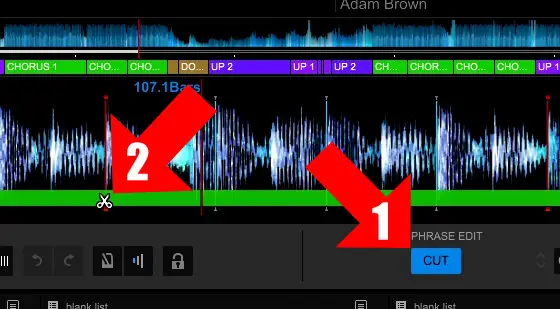
To split a phrase:
1) click on “cut” to select the cut-mode and make the button blue (button 17)
2) click on the colored phrase bar in the lower beatgrid on a line of the beat you want to split
(when you hover over a line of a beat, your mouse cursor becomes a scissor)
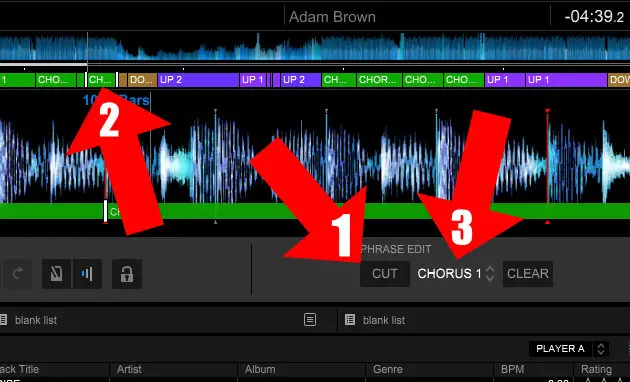
You still can not select assign a phrase-type (intro, outro, chorus etc).
To do that:
1) make sure the cut-mode is off (=grey) (button 17)
2) click on a colored phrase bar in the upper beatgrid to select the phrase in the track
3) now you can select a phrase type with button 18.
I wish I was making this up, but this is really how things work.
Pioneer clearly needs to hire a UX-expert.
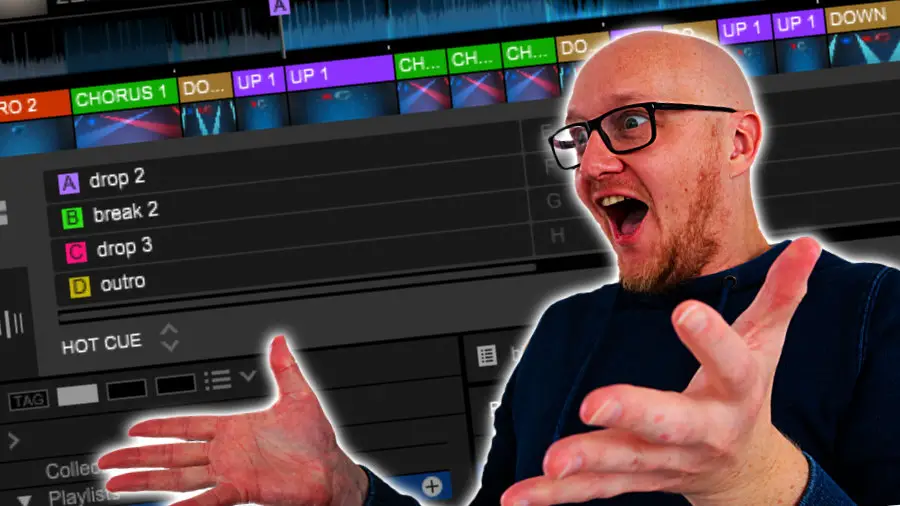
Phrase types
The different phrase types are:
- Intro: start of a track
- Up: buildup
- Down: breakdown
- Chorus: the drop
- Bridge: an interlude which is neither a drop or break
- Verse: the break
- Outro: ending of a track